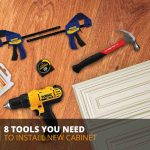
Are you remodeling your kitchen, bathroom, or other rooms with new cabinets or bookcases? Installing them yourself can save money and allow you to spend your money on even better products. If you buy unfinished cabinets and paint or stain them yourself, you can save even more. Here is what you need to get the job done.
Depending on your level of carpentry skills and how many home improvement projects you do, you may already own some of the tools in this list. Not all items will be needed but many will be helpful depending if you are working alone or have assistance.
It is also important for your budget to consider the cost of the needed tools over hiring a professional. If the rate to hire is less than or equal to the cost of new tools, it may be worth it to leave the job to the pros.
Investing in the right tools will enhance the quality of your installation, reduce debris, and save you money. All of which every Do-It-Yourselfer is looking for.
Required Tools
| Tool or supply | Purpose/Reason for Tool or Supply |
| Cabinet claw/clamps | A cabinet clamp is a helpful tool that will hold the face frame together securely while you are assembling your cabinet. It also keeps everything in place while screws are installed. |
| Tape Measure | A tape measure will be needed to identify several measurements for your installation including where the cabinets will be hung, openings for appliances, distances between structures, locations of outlets, etc. |
| Pencil | A pencil will be needed to mark measurements taken while installing, and maybe to take notes as you go. |
| Printed Layout | Print your Prime Cabinetry design, provided by our design team, for ease of installation. Having the layout to work from will ensure you remember exactly where each cabinet is meant to be installed while you are working. |
| Power Drill | A power drill is commonly used for assembling cabinets, hanging cabinets, installing knobs and pulls on cabinet doors, etc. |
| Laser Level or standard 72” level | A level or laser level is a control tool that provides a reference for ensuring your cabinets are perfectly horizontal to the floor. This is needed for countertop installation to run smoothly as well. |
| Stud Finder | As the name implies, this handheld device helps you locate the framing studs behind the drywall. It can also help you locate plumbing and electric lines in some cases so you avoid running into those. |
| Touch Up Kit/Putty | A touch up kit can be purchased from Prime Cabinetry when you order your cabinets. It is used to cover any small dings that occur during assembly and install and nail holes. |
| Trim Nailer | A trim nailer is most often used to install crown molding, toe kick, scribe molding, light rail molding, base moldings, etc. You could use brads and a hammer but most installers would say this tool is a necessity for cabinet installation. |
| Miter Saw | A miter saw is required to cut cabinet trim and crown molding at precise angles. It is also used to cut filler strips and some skin panels. |
| Wood Block | A wood block is used for installing crown molding. When working with full overlay cabinets the ¼” reveal of the face frame is not enough for the crown to be nailed to. The wood block is installed first, then the crown is nailed to the block. |
| Table Saw | A table saw is an electric woodworking tool with a circular blade mounted on an axel. The blade protrudes through the top of a table and provides support for the wood being cut. |
| Philips Screwdriver | A screwdriver designed to to be used with a phillips-head screw. This type of screw has an X shaped top and is what we use most in our cabinet assembly. |
Optional Tools
| Tool or Supply | Purpose/Reason for Tool or Supply |
| Jigsaw | A jig saw is ideal for cutting curves and complex shapes into wood or drywall. For cabinet installation it is commonly used for cutting outlet and plumbing holes, modifying universal cabinets, making short crosscuts on a board, etc. |
| Cabinet Jack | A cabinet jack is made for holding upper cabinets in place while hanging. This is an ideal tool to have on hand if you are limited on manpower or are working alone. If you have a crew installing the cabinets one may not be needed. |
| Cabinet Hardware Jig | A cabinet hardware jig is a great tool that helps you install your cabinet knobs or pulls to the doors perfectly every time. This tool is not required as there are other tricks out there to install your cabinet hardware but it is certainly useful. |
| Hearing Protection | Avoid ear damage from saws and nailers. Noise reducing headphones or earplugs are nice to have because construction sites are always loud. |
| Shop Vac | Anytime you are removing cabinets and sawing wood there is bound to be dust. A shop-vac is simply more durable for this type of use and with its five gallon size tends to clean debris best. |
| Wood Glue | Wood glue is a great option for assembling your cabinets. However, it is not required for assembly because our cabinets are sold with the needed brackets and screws. |
| Staple Gun | Staples and a staple gun is another great option for assembling your cabinets. However, it is also not required for assembly because our cabinets are sold with the needed brackets and screws. |
| Crown Moulding Jig | A crown molding jig is used to simplify difficult inside and outside crown molding cuts. Angles are tough so this handy tool really helps you master mitered corners and other angles. |
| Multitool/Oscillating Tool | A multitool is a power tool that oscillates allowing you to sand, saw, and cut different materials. It is helpful for a number of tasks with cabinet assembly and installation including trim cutting, grout removal, cabinet modifications, drywall cutouts, etc. |
| Shims | Cabinet shims are slender pieces of wood, cut into a wedge shape, that are used as a solution for things like leveling base cabinets on an uneven floor or flushing side panels for decorative door application. |


