by

Looking for some new kitchen design ideas for your remodel? We’ve created this handy infographic to help you out along the way! Find out the most popular themed kitchens, most popular kitchen materials, and how to create your favorite kitchen design theme.

  • Traditional Kitchen Theme: Use raised panel cabinets, granite countertops, marble backsplash, and maple wood flooring.
  • Transitional Kitchen Theme: Use flat paneled cabinets, marble countertops, ceramic backsplash, and ash wood flooring.
  • Contemporary Kitchen Theme: Use shaker style cabinets, concrete countertops, stone backsplash, and tile flooring.
  • Modern Kitchen Theme: Use flat/high gloss cabinets, quartz countertops, glass backsplash, and vinyl/high gloss flooring.
  • Rustic Kitchen Theme: Use inset/distressed cabinets, butcher block countertops, brick backsplash, and travertine or chipped flooring.
  • Industrial Kitchen Theme: Use a custom cabinets, stainless steel countertops, ceramic tile backsplash, and concrete flooring.

History of Kitchen Design – Infographic

The History of Kitchen Design Infographic by Kitchen Cabinet Kings

by

When you consider your pet to be an important part of your family, it makes sense that you want to consider its needs before you remodel your kitchen. Your remodeling project ideally should make it easier for all of your family members, including your cat, dog, or other fur companion to spend time in this room without being at risk of being hurt or inconvenienced. As you consider what ways you want to alter your kitchen, you can incorporate these pet-friendly ideas as you work.

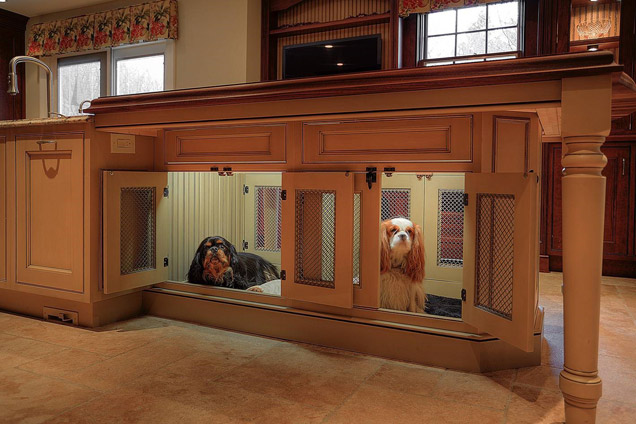
Dogs in Kitchen Cabinets


Hardwood Flooring

One of the easiest ways you can make your pet feel at home in the kitchen is by installing flooring that will safe and comfortable for it to walk on every day. Carpeting, especially loose varieties like shag, can get caught on a pet’s nails and foot pads and cause it to get injured. However, hardwood flooring like wood or tile is easy to walk on, safe for your pet’s nails, and also easy to clean up if your cat or dog leaves dirty footprints behind it.

Sleep and Play Areas

People who own cats know how difficult it can be to keep their feline friends off the table and counters. Cats and even some dogs like to jump up on the counters and tables to take a nap or be closer to their humans. With that in mind, you can dissuade this behavior by designating pet sleep and play areas in your kitchen. Taking the door off a cabinet or siding off a kitchen island and putting a bed inside will give your pet a place of its own to sleep. Likewise, putting a cat tree or even shelves on the wall for your felines to climb and play on will keep them off your tables and counters.

Food Storage

If your pet genuinely is a part of your family, you will want to find a way to feed it along with your kids and spouse in the kitchen. While your family dines at the table, your pet can munch on its own food when you create a pet-feeding drawer just for its needs. This drawer can contain your pet’s food and water dishes and slide out during mealtimes. After it is done eating, you can slide the drawer back to keep the pet food out of sight.

Pet Safety

Of course, allowing your pet in the kitchen should entail some safety measures as well. Cats, for example, are often adept at opening cabinet doors that are not locked or hinged securely. Dogs can jump up and accidentally turn on loose stove burner knobs. You can prevent accidents and your pet being hurt by pet-proofing your kitchen. Installing catches on the cabinet doors, using knob covers on the stove, and even using small appliances that can be installed directly under your cabinets can keep your kitchen intact and your pet safe.

by Wade Shaddy

Create illuminated space in any bookcase using a light bridge. This type of lighting is installed below any shelf using simple ambient lights to add depth and character to the bookcase. Typical light bridges illuminate objects other than books such as vases, flowers pictures or keepsakes. They serve to open up the bookcase by providing light between rows of books on on either side. Typical light bridges are installed in bookcases that have three sections, with the middle section receiving the light bridge. It’s fine to add a light bridge to any shelf for the same effect.

1. Measure the length horizontally across the top shelf of the bookcase. Purchase a light bridge that will fit between the two vertical sides of the bookcase. The light bridge doesn’t need to fit tight flush on either end. For example, if the shelf is 48 inches wide, use any light bridge fixture measuring between 18 and 36 inches.

2. Stain and lacquer the front of the light bridge if needed. Lots of light bridge fixtures have a single piece of molding across the front. Choose a molding profile that matches your existing trim, and apply stain that matches the existing bookcase.

3. Locate the nearest power outlet. Use a drill/driver and 1-inch Forstner bit to drill a hole through the back of the bookcase on the side needed to access the power outlet. Drill the hole one inch diagonally from the back corner. If the bookcase is installed to the wall, it’s OK to drill the hole through the side of the bookcase, one inch diagonally from the back corner on the side needed.

4. Place the light bridge fixture under the top of the bookcase. Center it flush with the front edge.

5. Hold the light bridge with one hand. Use your other hand to place two 5/8-inch screws in drilled holes on either end of the light bridge. Screw the screws in tight to secure the light bridge to the bookcase.

6. Pull the cord straight back from the light bridge fixture to the point where the shelf contacts the back. Use a hammer to tap one horseshoe nail over the cord to secure it to the back of the bookcase. If the bookcase has no back, or the back is no thicker than 1/4 inch, tap the nail into the underside of the shelf to secure the cord.

7. Insert the end of the cord through the 1-inch hole. Pull it snug. Tap two more horseshoe nails into the cord to finish installing the light. Plug it in. The switch to turn the light off and on may be on the cord or the fixture itself, depending on the model.

Things You Will Need

  • Stain (optional)
  • Lacquer (optional)
  • Light bridge fixture
  • Drill/driver
  • 1-inch Forstner drill bit
  • 5/8-inch screws
  • Hammer
  • Horseshoe nails

You can also place the light bridge on the back of the shelf, which is not recommended because the light is dampened — or you can place it under any shelf to illuminate the shelf below it.

If the top of your bookcase has a decorative trim piece across the front that’s greater than 2 inches wide, you don’t need a light bridge. Purchase hobby lights to fit behind it for the same affect.

Warning: Be careful when drilling through finished wood. Drill from both sides to prevent splintering. Wear safety glasses.